How To Age Books With Tea And Tights
Yes, you read that title right! It turns out that it’s really easy to make thrifted tights into spooky spider webs and to tea-stain the pages of a secondhand book — creating the perfect antique appearance. These two projects partnered with our tips for aging the outside of Goodwill books will give your library a complete facelift just in time for Halloween.
One thing that I love about creating custom décor from Goodwill finds is that they look more authentic than the plastic props you’ll find in chain stores. The other benefit to updating thrifted purchases is that since Goodwill donations are the beginning of job creation, because when you support our stores, you’re helping people within your community find employment. So, without further ado, let’s jump into these projects!
Project 1: Turning White Tights into a Spider Web
Materials
- White tights or nylons
- Scissors
- A microplane or food grater (optional)
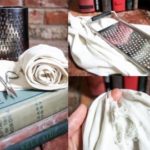
This project is so incredibly easy that I don’t even think I need to write out the steps! All you need to do is use scissors and/or a microplane/kitchen grater to put runs into the tights. Then, with your fingers, stretch the runs so the fabric separates into web-like threads. Keep snipping, grating and pulling until you like the way your web looks.
I found it helpful to have the books I was decorating nearby as I made the web so I could stretch it into place as I went. Since there’s so much elasticity in tights, it’s really easy to stretch them around items so they stay in place without tape or tacks.
Project 2: Tea-staining Book Pages
You may have tea-stained paper before, but the process of doing it for bound books is a little different because you can’t bake the pages to dry or completely cover them with tea (that would dampen the binding and make it hard to properly dry every page). Thankfully, the way that books age usually shows a darkening of the page edges while the inner portion stays lighter. This is easy to replicate with tea! Here’s how:
Materials
- A book to age
- Two large stacks of books to stabilize the tea-stained book as it dries
- A heat-safe dish that is longer than the height of the book
- 2 cups of boiling water
- 4 tea bags (not herbal — I used Earl Grey)
- A fan
- A paintbrush (optional)
- A kettle
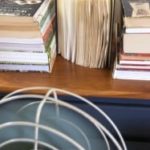
Step 1: Put the kettle on to boil the water. While that heats, build two stacks of books with the dish between them. The stacks need to be tall enough that the book can hang from it to dry (scroll down to see the picture of drying if necessary). Set the fan up so it blows on the area between the two stacks.
Step 2: Place the tea bags into your dish and pour the boiling water over it. Let that steep for ten minutes.
Step 3: Carefully remove the tea bags and set aside. Open the book holding both covers in one hand so the pages hang down. Dip the long edge of the pages only (not the cover or binding) into the tea. You can dip it in several times or hold it in the tea for a few seconds. Then pull it out of the tea and hold it above the dish for a few moments to let the tea drip off.
Step 4: Turn the book upright over the container and use the paintbrush or a tea bag to brush tea onto the top edges of the pages. Start on the corner that is already tea-stained, then brush softly in toward the binding so the tea stain will fade slightly as it gets closer to the spine. Avoid getting the binding and cover wet. Then turn the book again and do this same brushing technique on the bottom edges of the pages.
Step 5: If your book is still dripping, set it up to dry by placing its front and back covers between the two stacks with the container still underneath. If it’s not dripping, feel free to move the container so the stacks can be moved closer together. Turn on the fan to help the book dry. As it dries, the tea stain will darken.
Step 6: Wait for an hour, then turn the book around so the other short side of the pages is closer to the fan.
Step 7: Wait for a half-hour while that side dries, then you can remove your book from the piles and stand it upright with the pages fanned slightly to finish drying. At this point, the edges of every page should be perfectly browned just as an old book is! Each page will also gain a well-read crinkle/warp so they appear to have been leafed through again and again over the years.
And that’s it! Your spell-binding aged books are ready for display this Halloween season.


